Tuesday, 30 October 2012

Design inspiration: Lace theme

Time for some more design inspiration – this time I'm addicted to lace. There are so many different styles and lace patterns to choose from, and when translated into silver or gold, the delicate filigree always looks so beautiful and feminine.

I've picked a few examples of some lovely lace-inspired jewellery designs to spark some thoughts…

Lace inspired jewellery designs by various jewellery designers

Which one is your favourite? I personally love number 3 the best, such a whimsical lace filigree design.


If you’re struggling for inspiration, find your nearest fabric store and get a couple of small samples of different lace they have in stock. Vintage clothes shops are another great source. If you don’t have access to a fabric store, there are lots of great lace patterns to be found online, like this one below...

Lace patterns for jewellery design inspiration
Beautiful lace patterns like this one are easy to find online
Don’t forget to try out some of the creativity techniques in this post to expand on your possible design ideas and create something original.

Friday, 26 October 2012

Five reasons to start silversmithing


Five reasons to start silversmithing

1. You will be able to make yourself all those jewellery pieces you’ve coveted.

If you’re anything like me, you love buying and receiving jewellery and have an Etsy (or otherwise) wishlist containing hundreds of rings, earrings, necklaces, bracelets and other shiny things you have coveted for ages. You might also, like me, occasionally treat yourself to the odd thing on your wishlist, but mostly feel a little bit guilty for splurging on jewellery for yourself (it’s not like you actually need more jewellery). The great thing about learning to silversmith is that you can make everything you want for yourself! Simple things are obviously easier to start with, but when you learn a more tricky technique to make a more complicated piece, it really feels like you’ve earned it!

2. It’s extremely satisfying wearing something you have made from scratch.

“Oh, I LOVE that ring you’re wearing! Where did you get it?”
“Thanks – actually, I made it myself”
Those of you who make jewellery will recognise the above conversation. It’s really satisfying seeing some plain old silver sheet and wire turn into something beautiful, delicate, three dimensional, functional, modern…

3. There are always new techniques to learn.

There are lots of other good creative hobbies around. I tried making stained glass panels a couple of years ago, which was a lot of fun too, with similar practical elements (cutting glass, soldering, etc)… but I did feel it was quite straightforward after learning the basics. The difference with silversmithing is that there are so many techniques to learn and master that the hobby never gets old – and new techniques seem to be evolving all the time – just look at the invention of precious metal clay (clay which can be moulded like dough into a shape, then fired to burn off the clay and leave pure silver).

4. You will be able to give the best, meaningful gifts to your family, friends and loved ones.

It’s always nice to be able to give someone special a handmade gift. I think that’s especially true when it’s silver or gold jewellery that it something they would love to receive anyway, and you can design and make it just for them and their tastes. Personalisation is a great touch.

5. It’s not hard to learn.

It might seem difficult to start silversmithing – with all the mountains of tools needed and lots of unfamiliar names and techniques – but actually, in reality it’s not that hard to make simple things. I’m pretty confident that most people could do it. There are also a lot of short taster courses out there for complete beginners and books – so I thoroughly recommend giving it a stab and seeing how you get on!

Monday, 22 October 2012

Design of the Week: Silver wildflower 'Natalie' pendant

This week's design is a silver wildflower pendant, designed for my friend Natalie's birthday. I wanted to make her something pretty and nature-inspired, delicate enough to wear to work or casually. She doesn't wear many necklaces, but the ones I've noticed are quite simple and classic. I wanted to give her something a bit different to this: nothing that could be shop-bought - but also not a chunky or statement piece that wouldn't fit with her style.


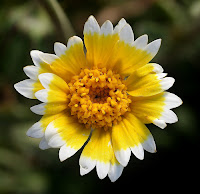
I love the variety in different wildflowers (like the one below) and the petal shapes - couldn't help but try and replicate something similar in silver. This wildflower pendant was the resulting design and is really versatile to wear.
Wildflower photo inspiration for a silver pendant
Wildflower photo by Steve Berardi

I made it from three layers of 0.5mm sterling silver sheet, pierced, lightly textured, formed then sweat-soldered together. I finally added some granulated silver balls to the middle for stamen, and a jump ring bail.

I actually made this week's design about three months ago, but it has taken me this long to finally finish the piece as I've been missing a crucial piece of equipment. I found it very difficult to polish between the layers of petals with a radial brush, and didn't want to risk the barrelling machine.

New toy: Magnetic Polisher

I have been saving for a magnetic polisher for ages, ever since using one in a workshop to polish my filigree pendant. I fell in love with how quick it was (just 15 minutes) at polishing and how perfectly tiny and compact the whole machine was (approximately 15cm x 15 x 25).

For such a tiny machine, however, it's quite pricey - looking at around £270 to import one from China, although I did find a cheaper one for just over £100. I ended up finding mine on ebay, the model I wanted from China but sold second-hand by a British seller instead, for a bargain £150.

The machine works by polishing light / delicate pieces with its tiny steel pins, which are moved around by the magnetics inside. It does a slightly different job to the barrelling machine in that it will only polish - any scratches and edges will be left the same, not softened in any way.

I'm very happy with the results from the polisher - the tiny pins managed to get right into the smallest gaps and the result was a beautifully polished piece. Natalie received her present this weekend, and I'm happy to report that she loved it and wore it straight away. I love being able to give my friends / family something I've made as a present!

Sunday, 21 October 2012

A slightly different creative attempt...

Panda 50th birthday cake
Cake decorating - a potential new hobby?!
I'm going to diverge from the silversmithing posts for just one minute to wish my Mum a very happy 50th birthday!

I made her this cake to celebrate: lemon drizzle sponge, with regal and fondant icing giant panda and bamboo. I thought a Chinese theme would be quite fitting for my Chinese mum! Excuse the rubbish camera-phone picture - it doesn't do much justice to the awesome edible gold sparkly dust on the 50.

It''s my first ever attempt at baking an iced cake, so took me a few hours - modelling with fondant icing is much harder than I first imagined. I also had a bit of a time trying to take it 200 miles to my Mum's house, but luckily the little guy survived. Looking online through some of the amazing cake creations some people have made, I'm actually quite tempted to learn cake decorating properly. Looks like another fun hobby!

Thursday, 18 October 2012

Printed Jewellery Boxes have arrived!

Last night I received a surprise package – rather bulky and heavy. I couldn’t remember ordering anything online to fit with the parcel, so I was pretty intrigued when I opened it. There was a lot of foam and some more boxes inside. Each of these boxes contained more boxes… Spring Jewellery boxes!

The results:
You might remember my post from awhile back, where I was searching for the right jewellery boxes and packaging. 

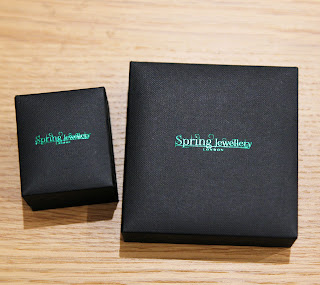
So, I’m rather excited to show off my first batch of jewellery boxes with my logo…

Spring Jewellery printed boxes from Talbots
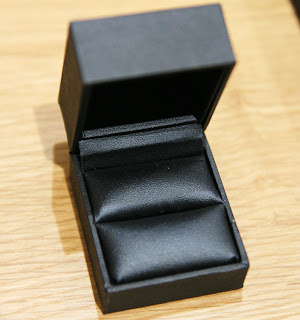
Spring Jewellery printed boxes from TalbotsJewellery box interior
I love the feel of the black leather interiors. I'd love it even more if the supplier could do these with contrasting white interiors (they do have some, but not with ahinged box, unfortunately). Ideally, I like a mint green exterior too, but I couldn’t find anything off-the-shelf which fit.

Ring and Pendant printed Spring Jewellery boxes
Ring box and Pendant / bracelet box

Choosing a jewellery box / packaging supplier:

I ended up going to Talbots – a supplier I hadn’t heard much about – to order these boxes. I struggled to find a decent supplier of pretty boxes for very small amounts; it wasn’t really worth it to order the 1000 minimum from China to get the exact boxes I wanted. Some of the other suppliers I looked at were:
  • Potters: good customer service, a fairly good range, although nothing that totally inspired me, but when I received samples they turned out to be a bit disappointing in quality. They also couldn’t / wouldn’t print on the outside lid for the boxes I wanted, which was a complete deal-breaker.
  • Finer Packaging: has some very nice products I was interested in, but they were more expensive and had a 100 box minimum order for each size, which I found a little prohibitive
  • Tiny Box Company: I really wanted to use them, but they were out of stock in the one cufflink box I wanted, and they didn’t really have many others in the luxury range. Also were a bit on the pricey side.
Lots of boxes packed in boxes - taking up space on my dining table!

General thoughts on using Talbots as a box supplier:

So, I have mixed feelings about Talbots right now. I’m undecided on whether I’d recommend them or not.
On the plus side:
  • Really impressed with the quality of both the boxes and the printing (the detail is fantastic)
  • They had a really great range of boxes, more in the unusual / luxury category than other suppliers, and they were really reasonably priced
  • They were quite accommodating – I wanted a green foil ink and although not originally offered in their standard colours, they did manage to find it for me
On the down side, however:
  • The sales / ordering process was excruciatingly slow – I first emailed them on August 7th, so it’s taken over 2 months to complete the order. I found the Sales representative quite unresponsive – sometimes not replying for 2 weeks – and had to chase quite a lot
  • The Sales Rep was also not great at answering my questions and would often ignore questions
  • I specifically asked (more than twice) for a full breakdown of the costs and totals for each product I was ordering before she put it through… and she said she would, but I didn’t hear anything after that. Then suddenly, boxes arrive at my house that I’ve been billed for, and I hadn’t received a word – no dispatch comms, no total price I would be charged, nothing!
  • I had emailed a list of products I wanted to order and the quantities – the Sales Rep then rang me back a few weeks / emails after to confirm the products. I repeated my order (some of the names of the product had changed since) and again, I’d asked her for an emailed breakdown (so I could check she’d got it right). Of course, when I received the order, I found she’d left off a whole product that I specifically remember her looking up the product code for, and missed another product that was in my email. Sigh.
  • They weren’t able to print on the cufflink boxes at all. I was insistent on the phone that I’d like them printed, she said she’d find out… but I heard nothing until they just arrived, completely unprinted. To add an extra kick, it looks like I was charged for printing on those items (not a huge amount, but still…)

So, what do you think? Have you found a good box / packaging supplier?

Wednesday, 10 October 2012

Design of the Week: Modern square cufflinks

Modern square sterling silver cufflinks
Modern squares
Not a technically difficult one this week, but I'm really pleased with the outcome. I designed a slightly more modern and clean cufflink with a dual texture - shiny and brushed matte. Still slightly on the geometric design theme...

These are 15mm square and 1.5mm thick, soldered to the standard solid silver cufflink fittings. I pierced the cut-out areas and paid a lot of attention to filing these evenly and straight - and because the silver is nice and thick, it retains it's shape well. Polished in a barrelling machine and used a wire brush attachment to create the matte area (using tape to mask the crisp line). Just re-polished all edges afterwards, as I wanted them to be shiny.

I think I'll make a few more of these!

Modern square sterling silver cufflinks on shirt sleeve
Look pretty good with a crisp white shirt

Modern square sterling silver cufflinks

Modern square sterling silver cufflinks

Saturday, 6 October 2012

Jewellery Model Photoshoot


Two weeks ago I scheduled a photoshoot with a model to take some test shots of my jewellery. I took the photos myself as I've been interested in photography for the past few years, but I haven't had many opportunities to shoot models.

I arranged to do an outside location shoot just around West London and luckily, the weather was really nice on the day. Invested some time beforehand in getting lunch and selecting a couple of outfits (bright colours, chic and classic). I didn't use any additional lighting equipment besides a reflector, but armed with my trusty old Canon 400d (I need to upgrade..!) and a Tamron 28-75mm f/2.8 lens, I got 350ish photos in about 1.5 hours.
Using a model to bring the jewellery and brand to life
If I was better at photoshop I would get rid of that stray strand of hair.

Overall, I was pleased with the shoot - I got some good shots and, importantly, more experience. The model knew how to pose from her experience and was very easy to shoot, but at times the jewellery did get lost as that wasn't her core modelling experience. I also think I might get better results, particularly around showing off the jewellery, from a studio shoot.

More photos and tips after the jump >>>

Wednesday, 3 October 2012

Design of the Week: Asymmetric amethyst pendant

I finished this piece recently - I got this great amethyst with bronze veining cabochon from Designer Cabochons and thought it would make a stunning statement pendant. The stone is roughly 25mm across (don't have my ruler handy!).

I make a lot of delicate pieces, which is more my style and the tendency of my designs, but it's nice to add a bolder statement piece into the mix too. It feels a little bit different to the other jewellery I've made.

Amethyst sterling silver asymmetrical pendant necklace

I decided to go for a simple bezel setting, then cut three equal lengths of different sterling silver tube to balance the shape of the stone, and soldered them together in one corner. Also added a bail which I cut from  0.3mm fine silver sheet.

I used this silver bearer wire for the first time to create the bezel – it has an inbuilt ‘shelf’ for the stone to rest on, which made creating the bezel easier and I left the back open as a result, as the stone was held in place by the shelf.

Amethyst sterling silver asymmetrical pendant necklace
The purple of the amethyst really comes out in natural light

Sunday, 30 September 2012

Tutorial: Make a Simple Geometric Charm

geometric diamond cut-out silver charm jewellery tutorial

So I'm going to attempt writing my first tutorial - let's start with a simple project for a beginner at silversmithing. A small charm like this is a great first project, being versitile to wear - on a charm bracelet, necklace, or turn into earrings - and you don't need a lot of equipment to make this. I opted for a geometric diamond design which is a good oportunity to practice accurate piercing, but other geometric designs will work just as well (see my post on geometric designs for inspiration).

Materials and equipment needed:

15mm x 15mm of 0.5mm width sterling silver sheet
2 x 0.5mm heavy sterling silver jump rings
A silver chain, if wearing as a pendant - I use a 18' trace chain

Piercing saw and 2/0 blade
Needle files
Drill and drillbit (I used 0.8mm)
Piece of wood
Optional: Soldering equipment (torch, soldering block, flux, hard solder, pickle)
Barrelling machine or pendant drill with radial discs
Chain nose pliers

Wednesday, 26 September 2012

4 Jewellery Goals before 2013

4 simple goals before 2013 from abeautifulmess.com

This is a nice idea from A Beautiful Mess blog: they set a challenge to write 4 simple, rewarding and action-oriented goals to achieve before the end of this year, to pull us through the busiest time of the year. The aim is to set goals which make our lives richer and happier.

I thought this might be a good opportunity to set myself some silversmithing / jewellery-related goals, to give myself something to aim for by the end of the year. As it's my hobby, achieving these goals will definitely make me happy and feel accomplished.


1. Launch an online shop / presence

One of my primary goals to make my growing hobby more sustainable is to launch an Etsy store and website, offering some one-of-a-kind pieces and some standard / personalised items. I’d also like to be able to take commissions. Hopefully this will allow me to offset the growing cost of silversmithing tools and sell pieces I don’t want to keep for myself (my collection of silver jewellery has to have its limits!). There is quite a lot of work involved in taking this step, but it’s a good goal for me to have.

2. Make something beautiful for my Mum's 50th birthday

About 5 years ago I promised my Mum that I’d buy her a ring for her 50th – something that she’d love and wear every day, possibly with a sapphire or opal (both her favourite stones). Then this year, when I started silversmithing, it seemed natural to aspire to make her a ring instead. Not an easy goal, as I’ve bought her an expensive opal and she would like it made in 18ct gold, so there really is no room for error – hence I have been trying to build up my skills to finally tackle this goal. Her birthday is at the end of October, so it’s an apt goal to achieve before the end of the year.

3. Learn an 'advanced' technique

I was a complete beginner to making silver jewellery at the start of 2012 – by the end of 2012 I’d like to say that I have attempted, and if possible mastered, a few advanced techniques. There’s a real sense of accomplishment knowing I’ve tried to do something new and it’s worked out ok. I’m not going to specify a specific technique right now, but there are a few in some of the books I own that I’d love to try.

4. Make a silver casting

Among my most recent tool purchases are some wax carving tools and jewellery wax. I think that casting opens up a whole other world of jewellery design possibilities, so it’s on my list to try carving something and get it cast in silver. This might also link to Goal #2, as I’m leaning towards casting the ring shank for my Mum’s present.

My reward for achieving each of these goals? I’m going to treat myself to a little something from my Amazon wishlist or HotelChocolat :)

Have you set any goals to achieve before 2013 – jewellery or otherwise? Would love to hear about them!

Friday, 21 September 2012

Design of the Week: Opal drop necklace

I've had a pretty crazy couple of weeks and haven't been able to post as much as I would've liked - fortunately some of that was because of good things, like a long weekend in Paris with my boyfriend (Eiffel tower, Disney, Champs Elysees, Laduree macarons).

I've been back in the workshop the last couple of evenings though, busy making new things which I'll be able to share soon. For now though, I'm long overdue a Design of the Week post so I'm going to have to cheat - this one is something I created quite a while ago. I love wearing it though (wearing it right now, in fact) - it's quite delicate and goes well with workwear.

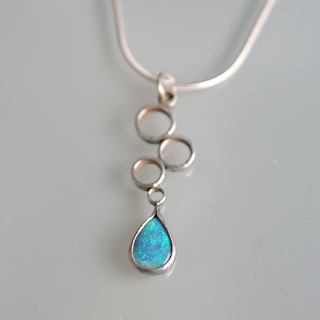
Here's my opal drop pendant - made from sterling silver. It's a black opal - but looks blue in most light, with lots of green flash. Opals are one of my all-time favourite stones; I have spent a fair bit of time browsing the internet for opals to buy since starting this hobby!

The bezel was slightly tricky for me when I made this, as I had never set a pointed stone before. The trick is to press in from the corner and file it down bit by bit, until the bezel is properly pushed over. The rest of the pendant is made from slices of various silver tube (which made me put a chenier tube cutter on my wishlist, as it's not as easy to cut as you might think!).

Black opal silver drop pendant necklaceBlack opal silver drop pendant necklace

Tomorrow, I've organised a last minute photoshoot in London, with a proper model. I've been planning, but as an amateur photographer I feel a little bit nervous as I don't know the model personally and don't want to waste her time. Fingers crossed I get some good shots out of it!

Monday, 10 September 2012

Lucky news!

Occasionally, I enter the odd competition or buy the rare lottery ticket, but I very rarely ever win. I’m sure many of you can relate.

Much to my amazement and delight, I got an email from Cookson Gold saying I’d won their August Shopping Spree competition from their new magazine! The prize was a hefty £200 worth of products from their website which I had the luxury of choosing!

Obviously, I was ecstatic at the thought of free Cookson goodies – amazing to get a good boost to my small-but-growing workshop and treat myself to some things I wouldn’t normally have the money to get. 


Cookson Gold competition prize
Cheesy shot of me with my winnings by my workbench

Choosing what to get in my ‘spree’

I was in a bit of a quandary trying to decide exactly what to get, and the right balance of bullion to tools. Did I splash it all on one big item on my wishlist, like a rolling mill? Or did I spend it all on silver sheet and wire, to shore up raw materials before Christmas? Or did I buy lots of little things to try and make the prize as big as possible?

I ended up with a bit of a mixture – decided to buy some tools, some silver and some little things. I’m especially happy with my new Knew piercing saw and Vallorbe swiss needle file set – I own cheap versions of both these and being able to upgrade for free to the best versions makes a huge difference, especially as I use both these tools on every piece. 

(I guess this is where all the advice about buying the best tools you can afford really rings true. I find the reality usually is, you can only afford basic because you need so many tools to start off with)

My prize...

Cookson Gold prize parcel box
So exciting - like Christmas!
Opening Cookson Gold prize box...
Lots of packaging inside the box...
Cookson Gold prize
Yay, goodies! Tools at the top, silver at the bottom
So, I got...
- Knew Concept saw
- Saw blades
- Vallorbe 6 needle file set
- 7 hole disc cutter
- 1.5mm letter punches
- Solder cutting pliers
- Iron binding wire
- Silver sheet in 0.5mm and 1mm
- Loose belcher chain
- Silver wire - selection of square and round

Thank you very much, Cookson!!

Saturday, 8 September 2012

International Jewellery London review

International Jewellery London review

International Jewellery London is a huge trade show which comes to Earl’s Court each year – and since this is my first year of jewellery-making, this was also the first time I’d heard of it. Intrigued by the publicity around it, I asked some fellow forum members on the Cookson Gold forum whether it would be worth my while trying to attend, given that I’m only a small designer-maker and not strictly ‘trade’ (yet). Their advice was to go for the gems and the inspiration.

So, I applied as a designer-maker, got my ticket, took half a day off work and went. Was it worth it?

Go for the gems

When I got to the exhibition centre, I was pretty much stumped with where to start. Earl’s Court is HUGE. I glanced at the map, strode off in one direction, then made a silly little twirl and went back to the map to understand it properly. My first stop was the gem stalls – I finally deciphered the huge map and made my way to that area.

International Jewellery London higlights, a.e.ward
Amazing chandelier and bar; browsing jewellery; A.E.Ward's extensive gemstone stall
I got cornered whilst browsing some diamonds on a stall by some man who demanded to have one of my business cards, know what I did, how big my workshop was, where it was based – all in a very interrogative style which was a bit intimidating! He made me feel really out of place and put me a bit off kilter after just arriving – I managed to escape and felt a bit better when I found stalls with more affordable gems.

The huge displays at Marcus McCallum were really inviting, but the crowds meant I couldn’t get too close. Then I spied some opals at Laroche Opals, and spent some time perusing their displays of loose opal stones. I couldn’t resist getting a couple of particularly pretty ones to add to my growing opal stash!

I had thought that would satisfy my need to buy something pretty – but then I stumbled across A.E.Ward. The rows and rows of stones were amazing – they had such a huge range of nearly every gemstone I could think of, and the clearly marked prices made it easy for me to get tempted. I ended up buying a few stones – three sapphires, a ruby and a beautiful teal tourmaline – and had to hold my breath when paying the bill. In total, I spent about £200 on those and the opals - quite a lot for me as a hobbyist!
Gemstone haul from IJL
My gemstone haul: sapphires, ruby, tourmaline and opals

Sunday, 2 September 2012

Design inspiration: Geometry theme


Sometimes I find that having a particular theme can give me the best inspiration for new designs or provide a really good starting point to using some of the techniques for design creativity that I previously shared.

This week, I’ve been really inspired by geometry designs. I love all the angular shapes, the symmetry, architectural elements and strong lines. It doesn’t all have to be about the traditional straight lines either – there are some really great designs with curved lines or circles (perhaps just one way to adapt a pattern). Here are some of my favourite geometric jewellery designs created by other artists:


Sources for geometric patterns can be found all over – in building design, art, interestingaerial maps, children’s colouring in books, crop circles… there should be no end to different sources of patterns out there.

Have you created any interesting jewellery pieces using a geometric design theme?

Thursday, 30 August 2012

Workshop Review: Silver Jewellery for Improvers at Amy Surman

I attended the ‘Silver Jewellery for Improvers’ workshop at Amy Surman a couple of months ago, with great results, so, here’s my review for anyone else interested in attending. It was overall a pleasantly different experience to the one I had on the Stone Setting course at Holts’ Academy (you can read my review of that here).

The basics
Workshop name: Silver Jewellery for Improvers
Cost: £70 + materials
Timings: 6 hours (incl. lunch) on a Saturday (Amy also does a weekly class version)
Location: Amy Surman Oxford Bead Shop, Cowley, Oxfordshire
Skill level: Intermediate, but suitable for most levels except complete beginner (other workshops are available with more guided tuition for complete beginners)

Overview
The Oxford Bead Shop is an independent retailer owned by Amy Surman, who offers a great selection of workshops across a number of different jewellery topics and disciplines, from silversmithing and metal clay to beading and lampwork. She also offers one-to-one private tuition at a reasonable price.

The Silver Jewellery for Improvers workshop is designed for those that have tried some form of silversmithing before and want to explore new techniques and designs, without being restricted to one particular technique. I found this was a great opportunity to try new things that I had wanted to try, with the support of a more experience tutor overseeing and advising.


In Amy's words: "The idea of the class is to give people who can't make our very popular weekly class the opportunity to come along for a whole day to explore and make their own projects with my support and gain ideas from the other three people in the class."

Pendant by workshop attendee (Photo Amy Surman)
Pendant by another attendee

The workshop is limited to only 4 spaces (there were only 3 including myself when I attended) which meant we got a vast amount of one-to-one teaching and advise over the course of the 6 hours. Attendees are encouraged to make something to their own design, so it’s a good idea to bring a design along – if not, students have time at the start to come up with a design with help from the tutor and her wealth of books for inspiration. The small group also allows attendees to get insight into others’ designs and the techniques they are learning, which is really nice.

Monday, 27 August 2012

Design of the Week: Treasure Chest pendant

Sterling silver treasure chest pendant necklace

I'm rather proud of my efforts in this week's design - this tiny little treasure chest pendant made from silver. It's only a dinky 15mm across!

Inspiration for the design

I've always been fascinated by jewellery which opens up or has the potential to keep something secret hidden within it - lockets, poison rings, perfume bottle necklaces - all these things have held my interest for a number of years.

About two years ago, I remember searching all over Etsy for a sterling silver treasure chest locket, because it just seemed like a really sweet idea. I didn't find many, and actually never bought one in the end, but I remembered this idea recently.

I've been toying with the idea of trying to make a hinge: a more slightly advanced technique which looked doable to me. I've also not really had a go at making a box yet by scoring and folding metal, so thought this chest might be a good design to try out both techniques. Perhaps a little ambitious, but I try not to do things by halves.

I didn't meticulously design all the details beforehand - it was a little made-up-as-I-went-along in this case. If I made it again in the future I would probably try and do a few scale drawings first... but I think it turned out ok in the end!

Sterling silver treasure chest pendant necklace
The little clasp on the front keeps the lid shut and conceals all the treasures
Silver treasure chest pendant necklace with golden coin
Full of gold treasure!

Making the design

The whole pendant was constructed from 0.5mm sterling silver sheet, 0.4mm sheet in 2mm strips, 1.2mm sterling silver tube, 0.6mm and 0.8 silver wire.

More on how I made this design & image after the jump >>>

Friday, 17 August 2012

Design of the Week: ‘Susie’ silver ring


I recently decided that I’d like to make this blog become well-rounded, providing not only some insight into my discovery of new silversmithing techniques and designs, but also some general tips, reviews and inspiration (with my personal take on things) to provide anyone else with an interest in designing and making jewellery with something interesting to read.

So, I’m going to try and post a ‘Design of the Week’ feature here each week to talk about one of my latest jewellery designs, alongside my posts on a wide range of jewellery-related topics. This is also going to help me keep on track with trying out new skills and techniques!

DotW: ‘Susie’ silver ring 

This week’s design is a delicate ring made in sterling silver, with a green tourmaline cabochon. I designed this for one of my best friends as it was her birthday this week, and so this ring is named ‘Susie’ after her.

Inspiration for the design


I based my design on two things: firstly, my knowledge of Susie’s taste in jewellery, and secondly, Susie’s favourite colour – light ‘sea’ green.

I have lived with Susie for several years at University, so I’m familiar with her style and existing (abundant!) jewellery collection. Typically, she wears delicate pieces, long necklaces, minimal and tiny bracelets (like this one I bought for her last Christmas) and rings. She loves the quirky jewellery brand ‘Les Nereides’ and has a penchant for pearls.

I therefore wanted my design to be delicate, pretty and quite girly but also quite simple and clean. I decided a ring would be a good choice as she loves wearing rings, and I saw this tourmaline which reminded me of the lovely sea colour which Susie is so fond of.

Making the design

This is the design I ended up with: a simple bezel-set tourmaline cabochon, with a hammered, wavey band. I thought the imagery of waves suited the sea green stone. I made the band out of two pieces of 1mm silver wire, bent with half-round pliers, hammered flat and then soldered together at the crossover points. I textured the wire with the end of the hammer, to give a subtle ‘random lines’ pattern.

I’m giving this to her tonight at a friend's dinner party, so I hope she likes it!

Silver sea-green tourmaline wave ring

Silver sea-green tourmaline wave ring on finger

More images after the jump>>>

Monday, 13 August 2012

Business cards have arrived!

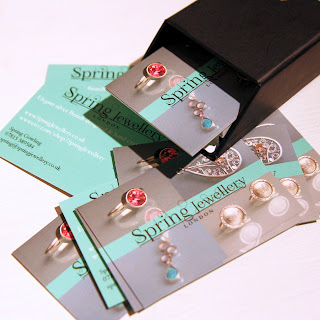
I got some exciting post - my first business cards have arrived! I decided that as I'm planning to launch Spring Jewellery later this year, I should go all official. I designed the card using a few of my jewellery images, plus the photo-editing software on my computer, and ordered from Moo - simple!


Spring Jewellery business cards
Neither website address is up and running yet but hopefully will be soon. My email works though!
Spring Jewellery business cards
Spring Jewellery logo stickers from moo.com
I also got these cute stickers to put on packaging
I've gone for a mint green colour for my brand, which I quite like (looks a bit blue in the photos) - what do you think?

Follow my blog with Bloglovin

Thursday, 9 August 2012

Tips and sources for jewellery design inspiration and creativity

Creativity and inspiration - brainstorming and sketches
As design is such a huge aspect of silversmithing and making jewellery, I’m constantly on the look out for new sources of inspiration and ways to get my creative juices flowing. There are those that say creativity cannot be taught – which I agree with, but you can consciously spend time working on a few techniques to allow for more creativity, and you can build up your own sources of inspiration.

Creative techniques

There are quite a lot of techniques out there for generating good ideas for a new design. Firstly – I recently learned that it’s not all about generating immediate ideas: the concept of ‘incubation’ is pretty new to me but is about thinking about a concept for a new idea, then mentally ‘parking’ the idea and not consciously processing it, which gives the sub-conscious time to process. If you’ve ever had the best ideas for a new design pop up at a random time, this is what incubation tries to encourage more of.
Bed, Bath, Bus. It’s a recognised concept that these are often the places where we come up with the best ideas, because our brains are not consciously working on anything too difficult. So definitely make use of these sorts of moments and flashes of inspiration – I now always carry around a notebook to capture them.

SCAMPER

Brainstorming is a well-used technique of mine to start thinking through different beginnings of ideas. I’ve also started using SCAMPER as a good technique for generating lots of ideas (they don’t all have to work – the point is to put every idea down to build upon, then afterwards you can choose from them):
  
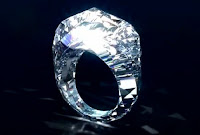
Shawish jewellery company produced an all-diamond ring as a substitute for a metal band
S – Substitute 
Try substituting a part of your design, or a material, for something else. What would it look like with plastic, concrete, wood, stones, instead of silver? What about substituting the colour? Just look at what Swiss Jewellery company, Shawish did when they substituted the metal in the ring for pure diamond! 
C – Combine 
 Combine concepts or ideas which wouldn’t normally go together, like a bottle opener with a bracelet, for example. What about combining different materials?

A – Adapt
 
Adapt something you notice in nature, or in a design somewhere completely different, into your design. Say you wanted earrings with lots of movement – could you adapt a windmill design to give you that?

M – Modify, Minimise, Maximise
 
 Can you modify your design in some way – or take something normally very small and maximise it to become the key feature of your design – for example making that rivet that holds two bits of metal together oversized and the main focus of the design. It works the other way around too – what about taking something large and making it tiny or, for example, modifying something you would wear on your head so you wear it on your finger instead?

P – Put to another use
 
Bracelet created from safety pins
 How can you take one idea or part of your design and put it to another use? I’ve seen really clever things done with turning safety pins into the links for bracelets, for example. Can you give your items dual functionality, like a ring which can also be worn as earrings?

E – Eliminate
How can you remove bits of your design for dramatic effect? Instead of adding metal, what about taking it away? Remove the unnecessary parts.

R - Reverse, Rearrange
Try switching the norms around, either in materials, designs, ideas. What about reversing the way you set stones and have it upside-down instead? Challenge all your assumptions and try something completely different.

Sources of inspiration

I find my most-used sources of inspiration fit into either: online or offline.

Offline

  • Going for walks – especially in the countryside I find there is a wealth of inspiration in nature and natural designs, plus animals and plants are ideas in themselves to be turned into a metal form.
  • Going to art galleries – sometimes even just the form of a line or the blend of colours can be inspirational. I also find that being around different types of art puts me in the right mindset and can really stimulate me to think in terms of jewellery design 
  • Visiting impressive architecture – again, I find that the visual stimulation is often enough to put me in the right mindset and think particularly about lines, form, structure.
  • Books and magazines – I like reading fashion magazines for jewellery inspiration, and similarly there are plenty of books out there that showcase other designers’ work and prompt inspiration in terms of techniques and style.

Online

  • Pinterest – my newest source for both finding and tracking inspiration, I find the idea of having a visual online moodboard great. It’s really handy for searching for design ideas, and you can repin things onto your own boards. Check out my Jewellery Inspiration pin board.
  • Etsy – the home of all things handmade. Although it’s definitely not cool ripping off other designers’ ideas, there’s plenty of inspiration that can be triggered by viewing the work of others.
  • Flickr - so many beautiful pictures to inspire, plus there are groups on nearly everything, including handmade and jewellery.
  • Since we’re here – Blogs! There are so many blogs with beautiful imagery that I want to just absorb and soak up.
What gets your creative juices flowing and where do you find inspiration?
Related Posts Plugin for WordPress, Blogger...